
Goodwill
Fixing Up One of My Favorite Recent Finds-A WW2 Era Navy Peacoat

Enter a caption
I was stoked when I found this peacoat at a local Goodwill outlet! I rarely ever pass up a vintage peacoat (as long as it’s a legit US. Navy peacoat and not a knock-off) unless it’s moth-eaten or has damage that I can’t personally fix. This one was just REALLY dusty, had a missing button, a small torn spot in the lining, one small loose lining seam, and one armpit with the lining loose around 1/2 of the seam…. nothing that an hour-ish of hand stitching and a serious lint brush session couldn’t fix 🙂
Thankfully, I had a period-correct button from another damaged WW2 peacoat made by the very same Naval Clothing Factory. Serendipity strikes again!
Last night, I got around to cleaning and stitching the peacoat up while sipping some tasty Hamm’s beer (not a paid advertising, but it should be). It took me a little over an hour start-to-finish. Then, I listed it on ebay this afternoon. See the link if you’re interested: WW2 Peacoat listing on Brother Luke’s Treasures Ebay Store
Also, there is a fantastic peacoat dating/history page on the Fedora Lounge if you want to do any of your own peacoat research. See link: Peacoat Dating on the Fedora Lounge
Below, there are a few of the pics from this project. As always, thank you for reading and sharing my blog! I am an independent poet, author, and singer/songwriter and I have my own ebay business to keep me as flexible as possible. But, writing takes time and if you appreciate what I do, if you have been moved or made to think by my writing, OR have just enjoyed something on my blog, please throw a buck or two in my tip jar!![]() Your kind contribution may buy me a cup of coffee out at my next writing session. Click my easy paypal “tip jar” link that follows and THANKS! -Luke
Your kind contribution may buy me a cup of coffee out at my next writing session. Click my easy paypal “tip jar” link that follows and THANKS! -Luke

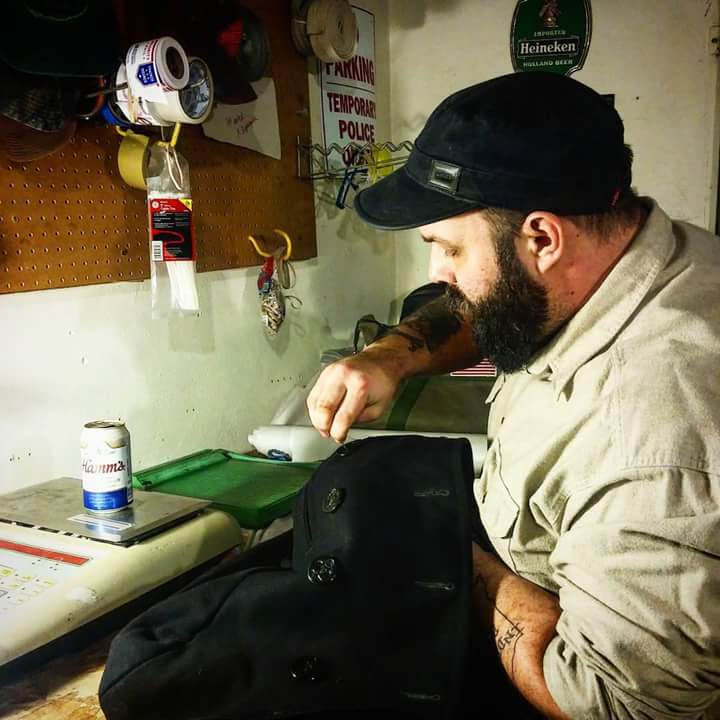
Luke Austin Daugherty repairing a vintage WW2 peacoat

Hand-stitched lining repairs on a vintage WW2 Naval Clothing Factory peacoat and the original tag.
“Redeemed”- Typewriter Poetry at the Thrift Store
![PhotoGrid_1471376574209[1]](https://bloomwithoutpermission.com/wp-content/uploads/2016/08/photogrid_14713765742091.jpg)
“Redeemed” -a poem by Luke Austin Daugherty, copyright 2016, All Rights Reserved
No correction tape was available, so pardon my mistakes. Here’s a larger version of the picture I took when I found the old Remington.
![PhotoGrid_1471380669898[1]](https://bloomwithoutpermission.com/wp-content/uploads/2016/08/photogrid_14713806698981.jpg)
A Remington Quiet Writer manual typewriter found in a bin at the west side Goodwill Outlet Store in Indianapolis by Luke Austin Daugherty.
As always, thank you for reading and sharing my blog! I am an independent poet, author, and singer/songwriter and I have my own ebay business to keep me as flexible as possible. But, writing takes time and if you appreciate what I do, if you have been moved or made to think by my writing, OR have just enjoyed something on my blog, please throw a buck or two in my tip jar!![]() Your kind contribution may buy me a cup of coffee out at my next writing session. Click my easy paypal “tip jar” link that follows and THANKS! -Luke
Your kind contribution may buy me a cup of coffee out at my next writing session. Click my easy paypal “tip jar” link that follows and THANKS! -Luke
On Reviving an Aging Teapot & the Glory of Minor Triumphs

Last Mother’s Day, I gave my wife a full set of vintage Revere Ware cookware. I had labored secretly over the several months previous to piece the set together, one item at a time. Since I am a full-time eBay seller, I’m always “picking” at thrift stores, auctions, and garage sales. Once I started to collect the individual pieces for my wife’s next gift, I knew it wouldn’t take me long to finish the task; a pot here, a lid there. So, on Mother’s Day 2013, the kids and I chased “Mom” out of the house for an hour, cleared out the old mish-mash bunch of pots and pans out of our cabinet. We replaced them with the new/vintage Revere Ware and put a big bow across the cabinet doors. When my wife got home, she loved her new gift. Because of the effort we had all put into it, her happiness was a satisfying triumph.
As an avid hot tea drinker in the midst of a family of avid tea drinkers, I was mildly disappointed when the “whistler” on my wife’s vintage Revere Ware teapot broke several months later. The little metal diaphragm finally worked loose from the lid due to age and use. The teapot, in contrast to the rest of the set I amassed, was of a more recent vintage and not quite as durably designed. The rest of the items were USA made cookware from the 1960s and back. But, the teapot was a Korean made unit, likely from the 1980s. It featured a plastic flip lid where the metal whistler piece was held tight with a plastic retainer rather than a metal rivet. Had the construction the teapot been that of a vintage, USA made Revere Ware unit with a metal rivet holding the whistler, I’m confident the teapot would still be daily whistling its intended tune.
With no whistler on the teapot, heating water became a bit annoying. Since the pot didn’t sound for a boil, you either had to check on it every few minutes or go in late to find it steaming like mad. This situation cast a bit of a shadow on our family teatime and begged to be remedied. For the mean time, we would tolerate the mute teapot. But, I knew that I would eventually run across a suitable replacement Revere Ware teapot as a product of my weekly “treasure hunting.” On one recent excursion, I found not only a similar teapot, but the EXACT same one in an 8×4 foot bin at my local Goodwill Outlet Store. Yet, I had to ask myself before glorying in the minor triumph of my find, “Is the whistler in good shape?” As I flipped up the little spring-loaded plastic lid, I saw to my delight that the whistler diaphragm was present and tightly affixed. With that question settled, I excitedly liberated it from the pile of donated wares and placed it safely in my Goodwill cart for purchase.
Still, there was one problem with this teapot that I would have to address before my family would be able to use it. The teapot’s previous owner had badly neglected its maintenance. First, the stainless steel top was very dirty and the copper bottom badly tarnished. Neither of those things bothered me since I often must clean up or polish acquisitions before selling them on eBay. Tidying up the externals of this teapot would just be “another day at the office.” The more difficult issue was that the inside suffered from a serious build-up of calcium and other hard-water distillates, apparently from many years of use. The entire bottom and most of the sides of the inner pot were heavily crusted. At first glance, I didn’t know if I would ultimately be successful in getting the inside of the pot to a usable condition due to the severity of the build-up, but I wanted to give it a try.
So, this week I decided to slay the foe of this calcium build up! I do apologize for my melodrama and realize that an aging teapot is no great issue in the grand scheme of things. But, though it was ultimately small matter, it was still a matter to be taken care of. I worked on the teapot a bit each day starting last Wednesday. There was a point, after my second attempt at getting the calcium to loosen up, when I thought I just might not get it clean and have to give it back to the Goodwill from whence it came. It took three primary cleaning phases to get the shale-like crust dissolved, broken up, and loosened from the metal. I measured some calcium fragments that came out of the pot with my digital caliper as being 4mm thick. The last batch of broken-up calcium from the third cleaning can be seen in this picture.

When I got the inside of the teapot finished this afternoon, I cleaned and polished its outside surface. All said and done, after completing the task today, I felt like the valiant slayer of lesser dragons. I now sit here sipping Red Rose Original Pekoe tea from a 1930s Noritake china teacup as I type this sentence, having used the hot water from the revived teapot. All is right with the world…

“Now, enjoy a hot cup of tea from your revived teapot and revel in your minor triumph! Of such small triumphs is the happiness of daily life secured and the neglected cobwebs of melancholy swept out of its corners.”
Below, you’ll see a picture of the items needed to accomplish such a task yourself. Most teapots will not be in such an abysmal state as mine and will not require much effort to freshen up.

If you are only trying to remove tea stains from your teapot, use this method:
1. Put one cup of baking soda in the teapot
2. Fill it the rest of the way with water
3. Bring to a boil, then let it cool
4. If needed, due to severe staining, scrub around in the inside with a bottle brush and repeat steps 1 and 2
5. Rinse out the soda water and wash with soap and water
If you are removing minor calcium build-up, use this method:
1. Use a mixture of 1 part white vinegar to 2 parts water.
2. Bring to a boil, let it cool, and sit overnight to loosen the build-up. The water should be very milky looking when you pour it out.
3. Rinse and wash. Repeat the process if needed.
If you are removing a major calcium build-up, use this method:
1. Fill the teapot up to the top of the calcium build up with straight white vinegar.
2. Bring to a boil, let it cool, and sit overnight to loosen the heavy buildup.
3. Most likely, the build-up will not all be loose. Take a long, narrow knife that you don’t mind dulling up the end of a bit. Get the teapot into some good lighting where you can see down into the inside to detect the caked-on areas. Use your knife to scratch around and scrape the caked-on calcium.
4. Rinse the loosened pieces out and repeat as necessary until all is gone.
5. If the build-up is stubborn, repeat the entire process again.
To clean and polish the outside of a dirty metal teapot, use this method:
1. Give the outside a normal soap and water washing.
2. Use liberal amounts of Barkeeper’s Friend and a sponge to clean the tarnish and build-up from the stainless steel, brass, or copper.
3. For heavy areas, use a small amount of water and a lot of Barkeeper’s Friend to make a heavy paste all over the area. Let it sit for a few minutes to work on the tarnish. Rinse and repeat as needed.
4. A stubborn tarnish will need a significant amount of “elbow grease” to get clean. The outside of the teapot I was cleaning took me about 15 minutes of scrubbing to get completely bright.
5. Wash with soap and water normally
Now, enjoy a hot cup of tea from your revived teapot and revel in your minor triumph! Of such small triumphs is the happiness of daily life secured and the neglected cobwebs of melancholy swept out of its corners.
